


How to Restore Windows Photos Viewer on Windows 10 & 11
By Timothy Tibbetts |
This tutorial shows you how to restore the classic Windows Photo Viewer and set some or all file associations so the picture, image, or photos you choose open in Windows Photo Viewer.
The difference between Photos and Photo Viewer can be a bit confusing, so if you're not sure what's what, here's how it works. There are two separate apps - Photos and Windows Photo Viewer. Windows Photo Viewer is built into Windows 10 if you upgrade from Windows 7. If you clean installed Windows 10, Photo Viewer was replaced by Photos and is now hidden. Windows 11 also does not include Windows Photos Viewer.

So, why bother using Windows Photo Viewer at all? Photos is a more extensive app and can use two to three times the memory of the Photo Viewer. If your goal is to view your photos, then Photo Viewer is better.
Video tutorial:
Restore Windows Photo Viewer on Windows 10 & 11
We've simplified the process by providing the registry file.
Download Restore Windows Photo Viewer on Windows 10 & 11, and extract the files.
Double-click Restore the Windows Photo Viewer ALL USERS.reg or Restore the Windows Photo Viewer CURRENT USER.reg to restore the Restore Windows Photo Viewer.
To remove Windows Photo Viewer, double-click on UNDO Restore the Windows Photo Viewer CURRENT USER.reg or UNDO Restore the Windows Photo Viewer ALL USERS.reg.
Click Yes when prompted by User Account Control.
Click Yes when prompted by Registry Editor.
Click OK when prompted by the Registry Editor.
This tweak is included as part of MajorGeeks Registry Tweaks, and donations are accepted here.
To use Photo Viewer, you have three options:
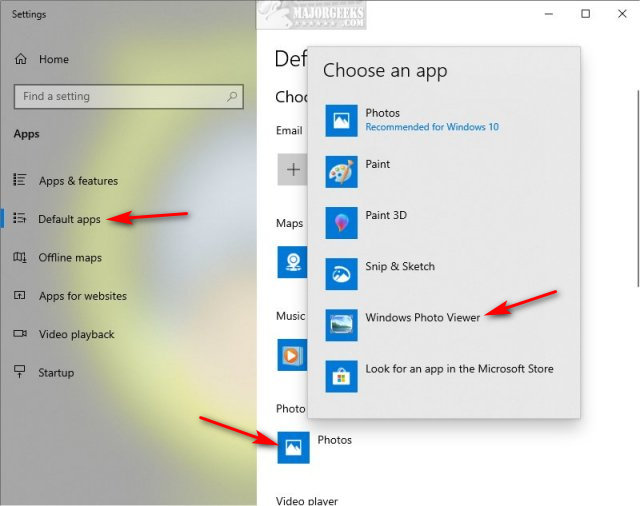
1: Use Windows Photo Viewer as Your Default Photo App (Windows 10)
Press the Windows Key + S, type in default, and click on Default apps.
Click on Photos, and click on Windows Photo Viewer.
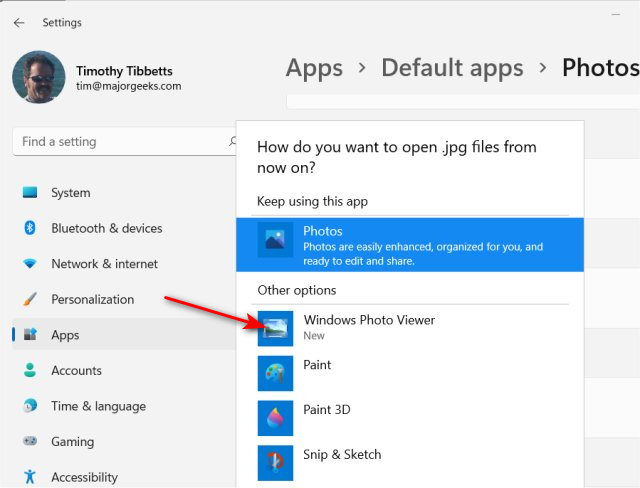
2: Use Windows Photo Viewer as Your Default Photo App (Windows 11)
Press the Windows Key + S, type in default, and click on Default apps.
Click on Photos.
Click on the file type (JPG, JPEG, PNG) you want to open with Windows Photo Viewer.
Click on Windows Photo Viewer. If you don't see Windows Photo Viewer, click on Open with > Choose another app.
3: Use Windows Photo Viewer For Individual Photos or Types (Windows 10 & 11)
You can also open a single file and optionally set Windows Photo Viewer as the default app at the same time.
Open File Explorer and right-click on any image you want to open with Windows Photo Viewer.
Click on Open with. Click on Windows Photo Viewer.
Similar:
How to Add or Remove 'Edit With Photos' Context Menu in Windows 10
How to Add or Remove 'Edit With Paint 3D' Context Menu in Windows 10
How-to Edit Your Videos With the Microsoft Photo App
Stop ‘Your Weekend Recap’ Notifications in Windows 10 Photos App
comments powered by Disqus
The difference between Photos and Photo Viewer can be a bit confusing, so if you're not sure what's what, here's how it works. There are two separate apps - Photos and Windows Photo Viewer. Windows Photo Viewer is built into Windows 10 if you upgrade from Windows 7. If you clean installed Windows 10, Photo Viewer was replaced by Photos and is now hidden. Windows 11 also does not include Windows Photos Viewer.
So, why bother using Windows Photo Viewer at all? Photos is a more extensive app and can use two to three times the memory of the Photo Viewer. If your goal is to view your photos, then Photo Viewer is better.
Restore Windows Photo Viewer on Windows 10 & 11
We've simplified the process by providing the registry file.
Download Restore Windows Photo Viewer on Windows 10 & 11, and extract the files.
Double-click Restore the Windows Photo Viewer ALL USERS.reg or Restore the Windows Photo Viewer CURRENT USER.reg to restore the Restore Windows Photo Viewer.
To remove Windows Photo Viewer, double-click on UNDO Restore the Windows Photo Viewer CURRENT USER.reg or UNDO Restore the Windows Photo Viewer ALL USERS.reg.
Click Yes when prompted by User Account Control.
Click Yes when prompted by Registry Editor.
Click OK when prompted by the Registry Editor.
This tweak is included as part of MajorGeeks Registry Tweaks, and donations are accepted here.
To use Photo Viewer, you have three options:
1: Use Windows Photo Viewer as Your Default Photo App (Windows 10)
Press the Windows Key + S, type in default, and click on Default apps.
Click on Photos, and click on Windows Photo Viewer.
2: Use Windows Photo Viewer as Your Default Photo App (Windows 11)
Press the Windows Key + S, type in default, and click on Default apps.
Click on Photos.
Click on the file type (JPG, JPEG, PNG) you want to open with Windows Photo Viewer.
Click on Windows Photo Viewer. If you don't see Windows Photo Viewer, click on Open with > Choose another app.
3: Use Windows Photo Viewer For Individual Photos or Types (Windows 10 & 11)
You can also open a single file and optionally set Windows Photo Viewer as the default app at the same time.
Open File Explorer and right-click on any image you want to open with Windows Photo Viewer.
Click on Open with. Click on Windows Photo Viewer.
Similar:
comments powered by Disqus
