

· How To and Tutorials
· Life Hacks and Reviews
· Way Off Base
· MajorGeeks Deals
· News
· Off Base
· Reviews
· Life Hacks and Reviews
· Way Off Base
· MajorGeeks Deals
· News
· Off Base
· Reviews

· YouTube
· Facebook
· Instagram
· Twitter
· Pintrest
· RSS/XML Feeds
· News Blur
· Yahoo
· Symbaloo
· Pintrest
· RSS/XML Feeds
· News Blur
· Yahoo
· Symbaloo
· Top Freeware Picks
· Malware Removal
· Geektionary
· Useful Links
· About Us
· Copyright
· Privacy
· Terms of Service
· How to Uninstall
· Malware Removal
· Geektionary
· Useful Links
· About Us
· Copyright
· Privacy
· Terms of Service
· How to Uninstall


· View Essential System Details with myResources
· Control When Windows 10 Updates with Kill-Update
· How to Fix There Was a Problem Resetting Your PC Error on Windows 10
· How to Turn on or off Recommended Troubleshooting in Windows 10
· MajorGeeks Deals Page
· test jim
· How to Set a New Home / Start Page In Edge
· How To Remove the Bing Discover Button on Microsoft Edge for Windows, Mac and Linux
· How to Block Spam Calls on a Samsung Phone
· How to Change DPI Scaling Settings in Windows 10 or 11
· How to Install Threads on Your Windows Desktop
· MajorGeeks and Cheat Happens August 2023 Give-A-Way
· Here's What You Need to Know About LogoFAIL
· Using AeroShake To Clear Your Desktop
· How to Edit Audio in Your Videos Using Shotcut
· How to Diagnose RAM Issues with Windows Memory Diagnostic Tool: A Step-by-Step Guide
· Deciding Between Idle State, Sleep Mode, and Shutdown: What's Best for Your PC?
· Unlock Google's Hidden Powers: Search Tricks Every Geek Should Know
· 2024 Black Friday Deals
· TikTok Ban: What Happens If the Supreme Court Upholds It?
How to Disable or Enable Startup Apps in Windows 11
Managing your startup apps in Windows 11 can help with boot times and overall performance. Here are some ways you can manage your startup apps in Windows 11.
How to Disable or Enable Startup Apps in Windows 11 - Settings
Click on Start > Settings or press the Windows Key + I.
Click on Apps on the left.
Click on Startup on the right.
Each startup item you currently have is listed and the impact on your computer during Startup, although we don't pay much attention to that. It's important to remember that any apps that start with Windows will almost always remain running, using up your resources. If you don't use it, disable it.
Apps that run on Startup will be blue and say "On," and apps you've disabled will be gray and say Off.

You can also change the Startup setting for individual apps by clicking on Apps & features instead of Startup. While it requires more steps, it has the advantage of modifying background apps as Power optimized, which is handy for laptops.
Click on the three dots next to any app, and click on Advanced options.
Check or uncheck Runs at log-in to enable or disable the app during Startup.
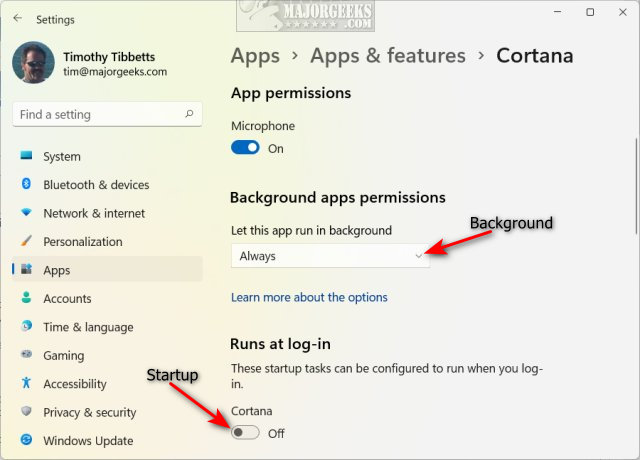
Click the dropdown box next to Background apps permissions to change the permissions from Always, Power optimized, or Never.
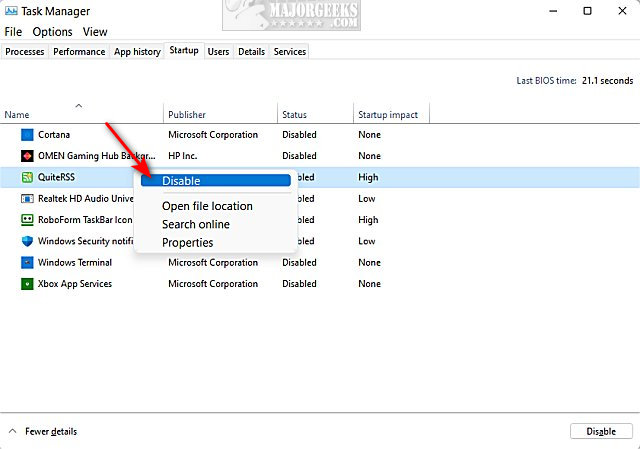
How to Disable or Enable Startup Apps in Windows 11 - Task Manager
Open Task Manager.
Click on the Startup tab.
Right-click or click on any Startup item.
Click Enable or Disable or click Disable in the lower-right corner.
How to Disable or Enable Startup Apps in Windows 11 - Third-Party Apps
We have dozens of free apps to manage your Startup items here. Most of them are freeware and easy to use, but we're going to focus on CCleaner because most people have it, and it is easy to use and allows you also to see scheduled tasks, Context Menu items, and much more.
Open CCleaner and click on Tools on the left.
Click on Startup.
Click on any item and click on Enable, Disable, or Delete (not recommended).
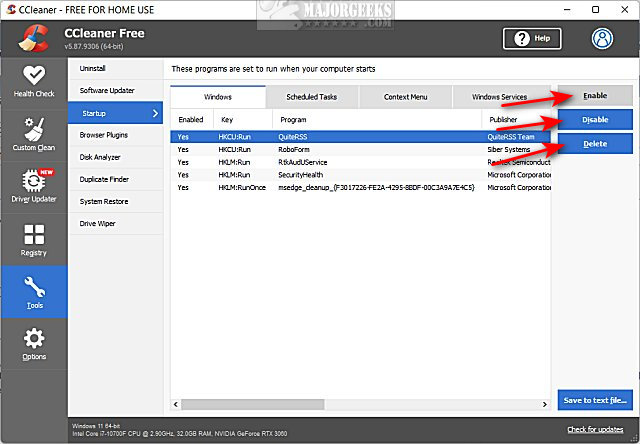
You can also check out the Windows Services tab for other items that might be running as a service in Windows 11.
Similar:
How to Turn Fast Startup On or Off in Windows 10
How to How to See the Startup Impact of Apps in Windows
How to Create a Startup Apps Shortcut
How to Restore or Verify Default Services in Windows 7, 8, 10, and 11
How to Identify Processes or Services on Your Computer
comments powered by Disqus
How to Disable or Enable Startup Apps in Windows 11 - Settings
Click on Start > Settings or press the Windows Key + I.
Click on Apps on the left.
Click on Startup on the right.
Each startup item you currently have is listed and the impact on your computer during Startup, although we don't pay much attention to that. It's important to remember that any apps that start with Windows will almost always remain running, using up your resources. If you don't use it, disable it.
Apps that run on Startup will be blue and say "On," and apps you've disabled will be gray and say Off.
You can also change the Startup setting for individual apps by clicking on Apps & features instead of Startup. While it requires more steps, it has the advantage of modifying background apps as Power optimized, which is handy for laptops.
Click on the three dots next to any app, and click on Advanced options.
Check or uncheck Runs at log-in to enable or disable the app during Startup.
Click the dropdown box next to Background apps permissions to change the permissions from Always, Power optimized, or Never.
How to Disable or Enable Startup Apps in Windows 11 - Task Manager
Open Task Manager.
Click on the Startup tab.
Right-click or click on any Startup item.
Click Enable or Disable or click Disable in the lower-right corner.
How to Disable or Enable Startup Apps in Windows 11 - Third-Party Apps
We have dozens of free apps to manage your Startup items here. Most of them are freeware and easy to use, but we're going to focus on CCleaner because most people have it, and it is easy to use and allows you also to see scheduled tasks, Context Menu items, and much more.
Open CCleaner and click on Tools on the left.
Click on Startup.
Click on any item and click on Enable, Disable, or Delete (not recommended).
You can also check out the Windows Services tab for other items that might be running as a service in Windows 11.
Similar:
comments powered by Disqus
