


How to Disable Indexing in Windows 10 & 11
By Timothy Tibbettson 06/15/2023 |
After upgrading to Windows 11, I noticed that my drive was indexed even though I had disabled it previously. Here's how to disable indexing on your hard drive.
If you didn't know, indexing your drive can help speed up searches by saving an index of the files on your hard drive. It can also slow down your hard drive. If you use Windows search a lot, I would leave indexing on or enable it if disabled.
Most geeks will disable indexing for performance, and it's easy to do. You can also use the same method on Windows 10, 8, Vista, and XP.
You might consider deleting junk files first if it's been a while to save time.
Video tutorial:
Open File Explorer.
Right-click on your hard drive (Usually C), and click Properties.
Check or uncheck the box next to Allow files on this drive to have contents indexed in addition to file properties.
Click on OK.
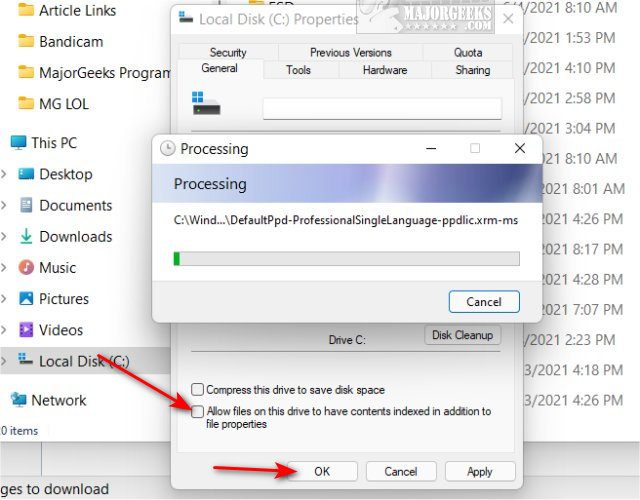
Depending on the size of your drive and the number of files, the process could take as little as few minutes to as much as a half-hour.
Click on OK when the process window closes.
Similar:
How to Use Cleanup Recommendations in Windows 11
Best Drive Cleaner? CCleaner VS Wise Disk Cleaner VS PrivaZer
How to Use Storage Sense to Delete Junk Files in Windows 10 Automatically
Use Storage to Find and Free up Space in Windows 10
How to Delete the Windows.old Folder from Windows 10
If you didn't know, indexing your drive can help speed up searches by saving an index of the files on your hard drive. It can also slow down your hard drive. If you use Windows search a lot, I would leave indexing on or enable it if disabled.
Most geeks will disable indexing for performance, and it's easy to do. You can also use the same method on Windows 10, 8, Vista, and XP.
You might consider deleting junk files first if it's been a while to save time.
Open File Explorer.
Right-click on your hard drive (Usually C), and click Properties.
Check or uncheck the box next to Allow files on this drive to have contents indexed in addition to file properties.
Click on OK.
Depending on the size of your drive and the number of files, the process could take as little as few minutes to as much as a half-hour.
Click on OK when the process window closes.
Similar:
