

· How To and Tutorials
· Life Hacks and Reviews
· Way Off Base
· MajorGeeks Deals
· News
· Off Base
· Reviews
· Life Hacks and Reviews
· Way Off Base
· MajorGeeks Deals
· News
· Off Base
· Reviews

· YouTube
· Facebook
· Instagram
· Twitter
· Pintrest
· RSS/XML Feeds
· News Blur
· Yahoo
· Symbaloo
· Pintrest
· RSS/XML Feeds
· News Blur
· Yahoo
· Symbaloo
· Top Freeware Picks
· Malware Removal
· Geektionary
· Useful Links
· About Us
· Copyright
· Privacy
· Terms of Service
· How to Uninstall
· Malware Removal
· Geektionary
· Useful Links
· About Us
· Copyright
· Privacy
· Terms of Service
· How to Uninstall


· View Essential System Details with myResources
· Control When Windows 10 Updates with Kill-Update
· How to Fix There Was a Problem Resetting Your PC Error on Windows 10
· How to Turn on or off Recommended Troubleshooting in Windows 10
· MajorGeeks Deals Page
· test jim
· How to Set a New Home / Start Page In Edge
· How To Remove the Bing Discover Button on Microsoft Edge for Windows, Mac and Linux
· How to Block Spam Calls on a Samsung Phone
· How to Change DPI Scaling Settings in Windows 10 or 11
· How to Install Threads on Your Windows Desktop
· MajorGeeks and Cheat Happens August 2023 Give-A-Way
· Here's What You Need to Know About LogoFAIL
· Using AeroShake To Clear Your Desktop
· How to Edit Audio in Your Videos Using Shotcut
· How to Diagnose RAM Issues with Windows Memory Diagnostic Tool: A Step-by-Step Guide
· Deciding Between Idle State, Sleep Mode, and Shutdown: What's Best for Your PC?
· Unlock Google's Hidden Powers: Search Tricks Every Geek Should Know
· 2024 Black Friday Deals
· TikTok Ban: What Happens If the Supreme Court Upholds It?
How to Enable or Disable Offline Files in Windows 10 & 11
Offline Files allows Windows users to make files available even when not connected to a Network. By enabling Offline Files, users can still access the files or folders you select when you are offline, or the network is slow.
Open the Control Panel in the Large or Small icon view.
Click on Sync Center.
Click on Manage offline files.
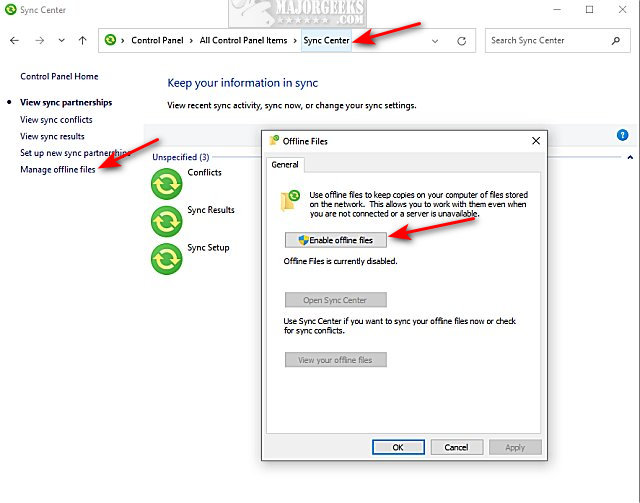
Click to Enable or Disable Offline Files.
You will be prompted to restart your computer, so do that now.
Next, you need to determine what folders have offline access.
Open File Explorer and click on the Network link on the left.
Right-click on the folder you want to make available offline and click Always available offline.
You will immediately see Completed preparing files, so they are always available offline.
Wait for that to complete. You will see a Sync icon overlay on any folder that is available offline.
Similar:
How to Create a WLAN Report in Windows
How to Rename a Network Profile Name in Windows 10
How to Turn On or Off Network Discovery (Make this PC Discoverable)
Windows 10 Can’t See Other Computers on Network
How to Find the IP Address of a Network Printer
comments powered by Disqus
Open the Control Panel in the Large or Small icon view.
Click on Sync Center.
Click on Manage offline files.
Click to Enable or Disable Offline Files.
You will be prompted to restart your computer, so do that now.
Next, you need to determine what folders have offline access.
Open File Explorer and click on the Network link on the left.
Right-click on the folder you want to make available offline and click Always available offline.
You will immediately see Completed preparing files, so they are always available offline.
Wait for that to complete. You will see a Sync icon overlay on any folder that is available offline.
Similar:
comments powered by Disqus
