


How to Add or Remove 'Maximum processor frequency' in Windows 10 & 11
By Timothy Tibbettson 06/30/2023 |
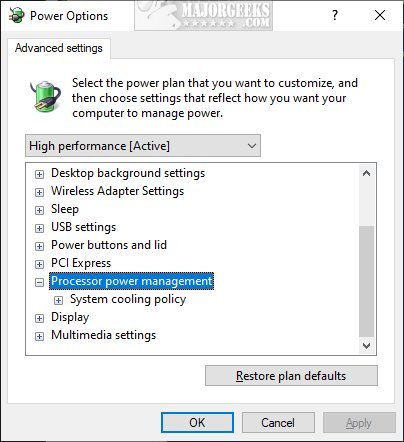
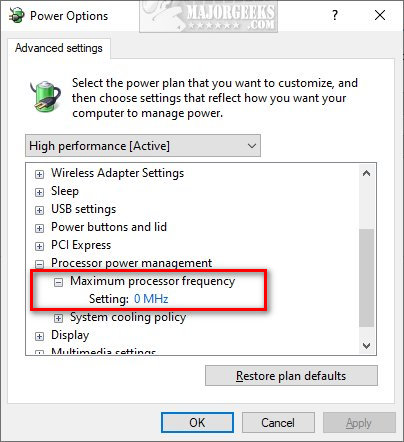
Maximum processor frequency specifies the operating frequency of your CPU's core. The maximum processor frequency option is hidden and set to 0 by default, which means your processor runs as fast as allowed. Advanced users can slow down the processor if your computer is running hot or consuming too much power.
Once added you will see the option Plugged in, and laptop users will also have On battery.
To edit the Maximum frequency, type in, and click on Edit power plan, and then click on Change advanced power settings.
Here's a before and after:
1: Add or Remove 'Maximum processor frequency' With PowerShell
Using the Command Prompt (PowerShell) only takes seconds and is easy for anyone to try.
Open PowerShell and type in:
Add:
powercfg -attributes SUB_PROCESSOR 75b0ae3f-bce0-45a7-8c89-c9611c25e100 -ATTRIB_HIDE
Remove:
powercfg -attributes SUB_PROCESSOR 75b0ae3f-bce0-45a7-8c89-c9611c25e100 +ATTRIB_HIDE
2: Add or Remove 'Maximum processor frequency' In Registry
While more complicated, you can also enable or disable the Maximum processor frequency option in the registry manually or download the registry files.
Open the Registry editor and type HKEY_LOCAL_MACHINE\SYSTEM\CurrentControlSet\Control\Power\PowerSettings\54533251-82be-4824-96c1-47b60b740d00\75b0ae3f-bce0-45a7-8c89-c9611c25e100 in the search bar.
Double-click Attributes and change the Value data:
1 - Remove
2 - Add
That's it.
Similar:
How to Turn on the Windows 10 Ultimate Performance Power Plan
How to Import or Export a Power Plan in Windows 10
How to Add Allow Sleep with Remote Opens Power Settings
How to Turn On or Off Require Sign-in on Wakeup in Windows 10
How to Add or Remove Sleep, Hibernate or Lock to the Start Menu in Windows 10.
How to Disable or Enable Hibernate in Windows
Sleep, Hibernate or Shut Down Your PC?
Once added you will see the option Plugged in, and laptop users will also have On battery.
To edit the Maximum frequency, type in, and click on Edit power plan, and then click on Change advanced power settings.
Here's a before and after:
1: Add or Remove 'Maximum processor frequency' With PowerShell
Using the Command Prompt (PowerShell) only takes seconds and is easy for anyone to try.
Open PowerShell and type in:
Add:
powercfg -attributes SUB_PROCESSOR 75b0ae3f-bce0-45a7-8c89-c9611c25e100 -ATTRIB_HIDE
Remove:
powercfg -attributes SUB_PROCESSOR 75b0ae3f-bce0-45a7-8c89-c9611c25e100 +ATTRIB_HIDE
2: Add or Remove 'Maximum processor frequency' In Registry
While more complicated, you can also enable or disable the Maximum processor frequency option in the registry manually or download the registry files.
Open the Registry editor and type HKEY_LOCAL_MACHINE\SYSTEM\CurrentControlSet\Control\Power\PowerSettings\54533251-82be-4824-96c1-47b60b740d00\75b0ae3f-bce0-45a7-8c89-c9611c25e100 in the search bar.
Double-click Attributes and change the Value data:
1 - Remove
2 - Add
That's it.
Similar:
