


How to Change Windows Defender Max CPU Usage
By Timothy Tibbettson 09/15/2022 |
Windows Defender has come a long way, now becoming the default antivirus program for most geeks. That doesn't mean you can't make some tweaks, however. One tweak we love to apply is limiting the maximum amount of CPU used during scans.
Any power user will appreciate not having Windows Defender wasting system resources, and it's easy to do. Also, anyone who would like the scan to complete faster, at the cost of system resources can up the max CPU usage.
Begin by opening PowerShell.
Type in Get-MpPreference | select ScanAvgCPULoadFactor. Your current Max CPU Usage, also called ScanAvgCPULoadFactor will be displayed. By default the setting is 50, or 50 percent.
To change the Max CPU Usage, you can use a number of 5-100 representing the percentage of CPU usage allowed.
Type in Set-MpPreference -ScanAvgCPULoadFactor YourPercentage replacing YourPercentage with the number you've chosen.
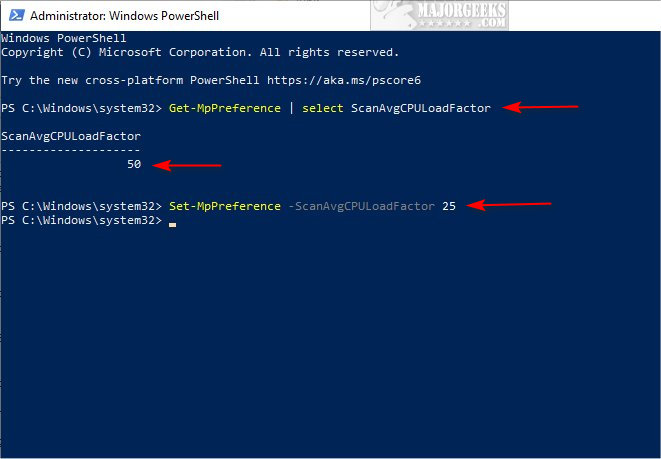
Not sure where to start? We'd cut the percentage in half, so try Set-MpPreference -ScanAvgCPULoadFactor 25.
You won't receive any confirmation, so type in Get-MpPreference | select ScanAvgCPULoadFactor again to confirm that your settings are active.
If you want to go in the opposite direction, there's one other possibility that falls outside of the 5-100 rule. Entering 0 will allow Windows Defender to use 100% of your CPU while scanning.
We used to be able to do the same thing with Group Policy Editor, but they've moved many settings and added many more. There's no real use for Group Policy Editor when the PowerShell method works so well.
Any power user will appreciate not having Windows Defender wasting system resources, and it's easy to do. Also, anyone who would like the scan to complete faster, at the cost of system resources can up the max CPU usage.
Begin by opening PowerShell.
Type in Get-MpPreference | select ScanAvgCPULoadFactor. Your current Max CPU Usage, also called ScanAvgCPULoadFactor will be displayed. By default the setting is 50, or 50 percent.
To change the Max CPU Usage, you can use a number of 5-100 representing the percentage of CPU usage allowed.
Type in Set-MpPreference -ScanAvgCPULoadFactor YourPercentage replacing YourPercentage with the number you've chosen.
Not sure where to start? We'd cut the percentage in half, so try Set-MpPreference -ScanAvgCPULoadFactor 25.
You won't receive any confirmation, so type in Get-MpPreference | select ScanAvgCPULoadFactor again to confirm that your settings are active.
If you want to go in the opposite direction, there's one other possibility that falls outside of the 5-100 rule. Entering 0 will allow Windows Defender to use 100% of your CPU while scanning.
We used to be able to do the same thing with Group Policy Editor, but they've moved many settings and added many more. There's no real use for Group Policy Editor when the PowerShell method works so well.
