


How to Change Your User And Account Names in Windows 10
By Timothy Tibbetts |
If you need or want to change your Windows computer User name or Account name, it can be relatively simple. Here's how.
The Account Name and User Name are located in the same place, making it easy to change both in one place. Let's look at the differences before proceeding because, while simple, it can be a little confusing. We'll continue to clarify the differences between the two going forward.
Account Name is your often a nickname and stores data using this name in the Users folder, which will need to be modified later.
User name is usually your real full name, which you see when Windows starts, for example. There's nothing else to change should you decide to use a new User name.
We also have a video guide we recommend you watch in its entirety before proceeding.
Change Account Name or User Name
Press the Windows Key + R and type in netplwiz and press Enter.
Click on the account name you want to modify and click Properties.
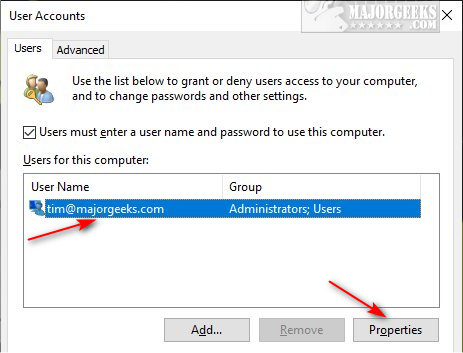
Users must enter a user name and password to use this computer must be checked if Properties is grayed out.
In the User name field, enter your new User name (Usually a nickname, like your first name).
In the Full name field, enter your new Account name (Usually your real full name).
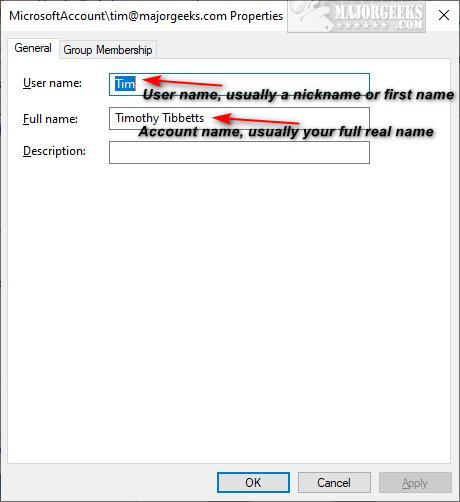
* If you only changed your Account name (full name in the Full name field), you will need to log out or reboot to see the changes, and you're all set.
* If you changed your User name (User name field), we need to rename your Users folder name and edit the registry in the next step.
Change Profile Folder Name
Because your user name is how the computer identifies you and stores application data and settings, you'll need to change the Users > User name folder name. Next, we'll let the Windows Registry know the new folder name, so your programs continue to work correctly. The following steps, while not difficult, are a little more complicated than the previous steps.
* You'll need to log into your administrator account first to rename the Users folder. If you don't see an Administrator account, press the Windows Key + R and type in netplwiz and press Enter. Click on the Advanced tab and click on Advanced under Advanced user management. Expand Users, click on Administrator and uncheck Account is disabled. Click on OK.
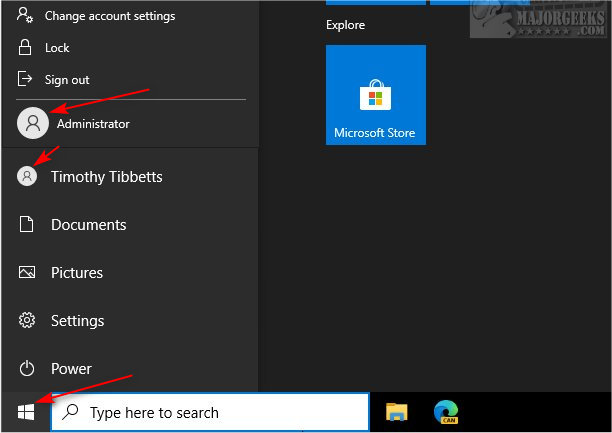
Click on Start > People icon and switch to an Administrator account.
Open File Explorer and rename the C:\Users\Your User name folder to the new User name (nickname) you selected.
* There's a good chance that the other account is logged in and you can't rename the folder. If so, open PowerShell and type in query session to list all users. Take note of the ID of the person you want to log off.
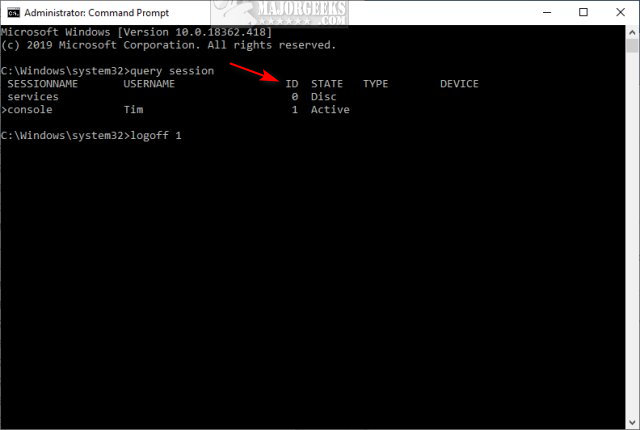
Type in logoff ID replacing ID with the ID number of the person you want to log off.
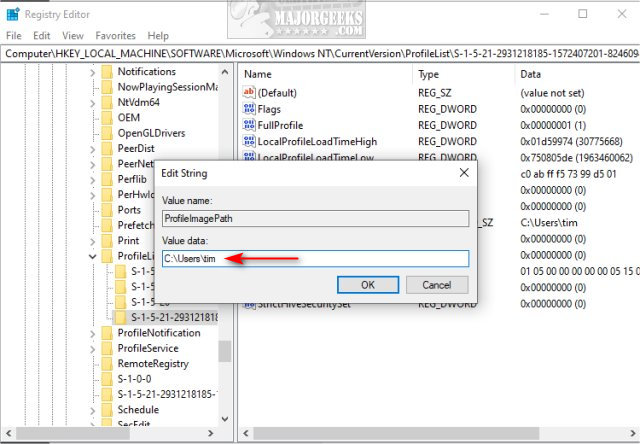
Finally, we need to let Windows know the new User name in the registry. Open the registry editor and type Computer\HKEY_LOCAL_MACHINE\SOFTWARE\Microsoft\Windows NT\CurrentVersion\ProfileList in the search bar.
Right-click on the ProfileList key and click Find. Type in the old Account name (nickname) and prese Enter.
In the right windows, double-click on ProfileImagePath and change the Value data after C:\Users\ to the new Account name (nickname) you chose earlier.
Reboot, and your new User name or nickname is now working.
Similar:
How to View Full Details of Any User Accounts in Windows
How to Hide User Accounts from the Windows 10 Sign-In Screen
3 Ways to Log off Another User in Windows 10
Force Users to Change Account Password at Next Login
How to Delete a User Profile in Windows 10
Reset Your Local Account Password In Windows 10
How to Add or Remove 'Accounts Settings' Context Menu in Windows 10
comments powered by Disqus
The Account Name and User Name are located in the same place, making it easy to change both in one place. Let's look at the differences before proceeding because, while simple, it can be a little confusing. We'll continue to clarify the differences between the two going forward.
We also have a video guide we recommend you watch in its entirety before proceeding.
Change Account Name or User Name
Press the Windows Key + R and type in netplwiz and press Enter.
Click on the account name you want to modify and click Properties.
Users must enter a user name and password to use this computer must be checked if Properties is grayed out.
In the User name field, enter your new User name (Usually a nickname, like your first name).
In the Full name field, enter your new Account name (Usually your real full name).
* If you only changed your Account name (full name in the Full name field), you will need to log out or reboot to see the changes, and you're all set.
* If you changed your User name (User name field), we need to rename your Users folder name and edit the registry in the next step.
Change Profile Folder Name
Because your user name is how the computer identifies you and stores application data and settings, you'll need to change the Users > User name folder name. Next, we'll let the Windows Registry know the new folder name, so your programs continue to work correctly. The following steps, while not difficult, are a little more complicated than the previous steps.
* You'll need to log into your administrator account first to rename the Users folder. If you don't see an Administrator account, press the Windows Key + R and type in netplwiz and press Enter. Click on the Advanced tab and click on Advanced under Advanced user management. Expand Users, click on Administrator and uncheck Account is disabled. Click on OK.
Click on Start > People icon and switch to an Administrator account.
Open File Explorer and rename the C:\Users\Your User name folder to the new User name (nickname) you selected.
* There's a good chance that the other account is logged in and you can't rename the folder. If so, open PowerShell and type in query session to list all users. Take note of the ID of the person you want to log off.
Type in logoff ID replacing ID with the ID number of the person you want to log off.
Finally, we need to let Windows know the new User name in the registry. Open the registry editor and type Computer\HKEY_LOCAL_MACHINE\SOFTWARE\Microsoft\Windows NT\CurrentVersion\ProfileList in the search bar.
Right-click on the ProfileList key and click Find. Type in the old Account name (nickname) and prese Enter.
In the right windows, double-click on ProfileImagePath and change the Value data after C:\Users\ to the new Account name (nickname) you chose earlier.
Reboot, and your new User name or nickname is now working.
Similar:
comments powered by Disqus
