

· How To and Tutorials
· Life Hacks and Reviews
· Way Off Base
· MajorGeeks Deals
· News
· Off Base
· Reviews
· Life Hacks and Reviews
· Way Off Base
· MajorGeeks Deals
· News
· Off Base
· Reviews

· YouTube
· Facebook
· Instagram
· Twitter
· Pintrest
· RSS/XML Feeds
· News Blur
· Yahoo
· Symbaloo
· Pintrest
· RSS/XML Feeds
· News Blur
· Yahoo
· Symbaloo
· Top Freeware Picks
· Malware Removal
· Geektionary
· Useful Links
· About Us
· Copyright
· Privacy
· Terms of Service
· How to Uninstall
· Malware Removal
· Geektionary
· Useful Links
· About Us
· Copyright
· Privacy
· Terms of Service
· How to Uninstall


· View Essential System Details with myResources
· Control When Windows 10 Updates with Kill-Update
· How to Fix There Was a Problem Resetting Your PC Error on Windows 10
· How to Turn on or off Recommended Troubleshooting in Windows 10
· MajorGeeks Deals Page
· test jim
· How to Set a New Home / Start Page In Edge
· How To Remove the Bing Discover Button on Microsoft Edge for Windows, Mac and Linux
· How to Block Spam Calls on a Samsung Phone
· How to Change DPI Scaling Settings in Windows 10 or 11
· How to Install Threads on Your Windows Desktop
· MajorGeeks and Cheat Happens August 2023 Give-A-Way
· Here's What You Need to Know About LogoFAIL
· Using AeroShake To Clear Your Desktop
· How to Edit Audio in Your Videos Using Shotcut
· How to Diagnose RAM Issues with Windows Memory Diagnostic Tool: A Step-by-Step Guide
· Deciding Between Idle State, Sleep Mode, and Shutdown: What's Best for Your PC?
· Unlock Google's Hidden Powers: Search Tricks Every Geek Should Know
· 2024 Black Friday Deals
· TikTok Ban: What Happens If the Supreme Court Upholds It?
How-To Use Disk Error Checking
Disk Error Checking was designed to test for, and fix, sectors, lost clusters, and system errors. Used in conjunction with the System File Checker most drive problems can be solved, or diagnosed without needing other utilities. Here's how to use Disk Error Checking.
Since Windows 8, Windows will periodically check your disks for errors, but sometimes you need to do a complete scan to solve problems. Luckily, Disk Error Checking is easy to do at any skill level. You can run Disk Error Checking from File Explorer or the Command-Prompt.
1: Run Disk Error Checking GUI
Right-click on the drive you want to scan in File Explorer and select Properties. Click on the Tools tab and finally click on Check where you see "This option will check the drive for file system errors.
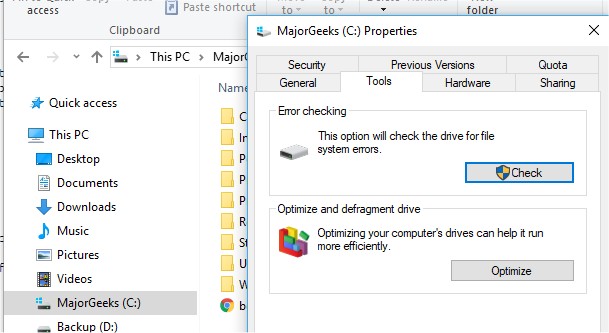
You can continue to use your computer while scanning, but Disk Error Checking rarely takes more than 10 minutes.
Because, as we mentioned, your drive is scanned as part of maintenance, you will be told if Windows thinks the drive needs to be scanned or not. Even if errors aren't found, you can still scan the drive.
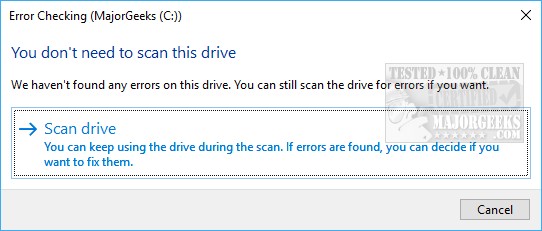
If errors are found, you will be asked to reboot so Windows can try to fix any problems found.
2: Run Disk Error Checking from the Command-Prompt or PowerShell
Since we're looking at a potential problem with your computer, there may be situations where you can't get Disk Error Checking working from File Explorer. In this case, we can run Disk Error Checking from the command-prompt.
Reboot into Safe Mode and open Command-Prompt or PowerShell as an administrator.
Type in chkdsk /f C: followed by enter.
Attempting to run Disk Error Checking without safe mode will result in an error that reads "Chkdsk cannot run because the volume is in use by another process." If you already got this far, close all applications and press Y for yes, then enter. To cancel a scan, type in chkntfs /x C:.
Advanced users can type in chkdsk /? to see all available switches and what they do.
How-To Use Microsoft System File Checker or Sfc /Scannow
comments powered by Disqus
Since Windows 8, Windows will periodically check your disks for errors, but sometimes you need to do a complete scan to solve problems. Luckily, Disk Error Checking is easy to do at any skill level. You can run Disk Error Checking from File Explorer or the Command-Prompt.
1: Run Disk Error Checking GUI
Right-click on the drive you want to scan in File Explorer and select Properties. Click on the Tools tab and finally click on Check where you see "This option will check the drive for file system errors.
You can continue to use your computer while scanning, but Disk Error Checking rarely takes more than 10 minutes.
Because, as we mentioned, your drive is scanned as part of maintenance, you will be told if Windows thinks the drive needs to be scanned or not. Even if errors aren't found, you can still scan the drive.
If errors are found, you will be asked to reboot so Windows can try to fix any problems found.
2: Run Disk Error Checking from the Command-Prompt or PowerShell
Since we're looking at a potential problem with your computer, there may be situations where you can't get Disk Error Checking working from File Explorer. In this case, we can run Disk Error Checking from the command-prompt.
Reboot into Safe Mode and open Command-Prompt or PowerShell as an administrator.
Type in chkdsk /f C: followed by enter.
Attempting to run Disk Error Checking without safe mode will result in an error that reads "Chkdsk cannot run because the volume is in use by another process." If you already got this far, close all applications and press Y for yes, then enter. To cancel a scan, type in chkntfs /x C:.
Advanced users can type in chkdsk /? to see all available switches and what they do.
How-To Use Microsoft System File Checker or Sfc /Scannow
comments powered by Disqus
