


How to Use the Ping Command in Windows
By Timothy Tibbetts |
The ping command in Windows is a powerful tool to verify the connection between your computer and another computer or server. Ping is easy enough to use but also offers many switches for custom pings.
Ping is executed from the command-line, also known as the Command Prompt or PowerShell.
Microsoft is migrating everyone from the Command Prompt to Powershell starting with Windows 10. For the end-user, there's no difference, but Windows 10 users should use PowerShell instead of the Command Prompt. Also, consider that while you don't need admin mode to execute ping, we use admin mode by default.
The easiest way to get to PowerShell is to press the Windows Key + X and click on Windows PowerShell (Admin).
Also, you can press the Windows key + S. This brings up the search and type in cmd for the command-prompt or Powershell. You should now see a "best match" with Command Prompt or Powershell as your choice.
[fullimage=209]
Right-click on Command Prompt or Powershell and then click on Run as administrator.
[fullimage=210]
User Account Control (UAC) may pop up here and if it does merely click on yes.
That's it. Now, let's ping something.
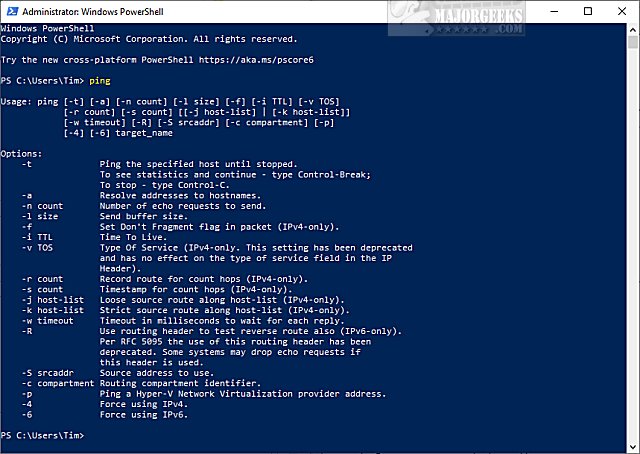
You can find all the available ping options (also called switches or syntaxes) by typing ping and pressing the Enter key. We'll post a list of switches at the bottom of this article.
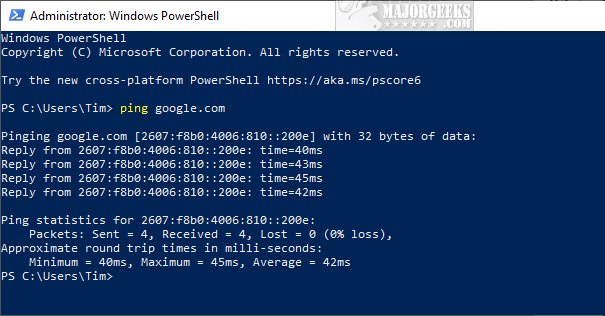
If you'd like to try your first ping; type in ping google.com. You will see the reply from the server in milliseconds. A summary will be displayed when finished. A successful ping would have a fast response time and no packet loss.
That's all there is to using ping; however, there are many available syntaxes.
-t - Ping the target until you force it to stop by using Ctrl-C.
-a - Resolve the hostname of an IP address target.
-n count - Set the number of ICMP Echo Requests to send, from 1 to 4294967295. The ping command will send 4 by default if -n isn't used.
-l size - Set the size, in bytes, of the echo-request packet from 32 to 65,527. The ping command will send a 32-byte echo request if you don't use the -l option.
-f - Prevent ICMP Echo Requests from being fragmented by routers between you and the target.
-i TTL - Set the Time to Live (TTL) value, the maximum of which is 255.
-v TOS - Set a Type of Service (TOS) value. Beginning in Windows 7, this option no longer functions.
-r count - Specify the number of hops between your computer and the target computer or device that you'd like to be recorded and displayed. The maximum value for count is 9. Use the tracert command to view all the hops between two devices.
-s count - Report the time, in Internet Timestamp format, that each echo request is received and echo reply is sent. The maximum value for count is 4.
-w timeout - Specifying a timeout value when executing the ping command adjusts the amount of time, in milliseconds, that ping waits for each reply. If you don't use the -w option, the default timeout value of 4000 is used, which is 4 seconds.
-R - Tells the ping command to trace the round trip path.
-S srcaddr -Specify the source address.
-p - Ping a Hyper-V Network Virtualization provider address.
-4 - Force the ping command to use IPv4 only but is only necessary if the target is a hostname and not an IP address.
-6 - Forces the ping command to use IPv6 only but as with the -4 option, is only necessary when pinging a hostname.
target -The destination you wish to ping, either an IP address or a hostname.
/? - Help switch plus the ping command will show detailed help about the command's several options.
Note that -f, -v, -r, -s, -j, and -k options work when pinging IPv4 addresses and the -r and -s options only work with IPv6.
Similar:
How to See Your Network Adapter Speed in Windows 10
How to Improve Your Wireless Network Performance
How to Reset Network Settings in Windows 10
How-To Reset TCP/IP or Internet Protocol
How to Find Your Router Login and Password
How to Update Your Router Firmware
comments powered by Disqus
Ping is executed from the command-line, also known as the Command Prompt or PowerShell.
Microsoft is migrating everyone from the Command Prompt to Powershell starting with Windows 10. For the end-user, there's no difference, but Windows 10 users should use PowerShell instead of the Command Prompt. Also, consider that while you don't need admin mode to execute ping, we use admin mode by default.
The easiest way to get to PowerShell is to press the Windows Key + X and click on Windows PowerShell (Admin).
Also, you can press the Windows key + S. This brings up the search and type in cmd for the command-prompt or Powershell. You should now see a "best match" with Command Prompt or Powershell as your choice.
Right-click on Command Prompt or Powershell and then click on Run as administrator.
User Account Control (UAC) may pop up here and if it does merely click on yes.
That's it. Now, let's ping something.
You can find all the available ping options (also called switches or syntaxes) by typing ping and pressing the Enter key. We'll post a list of switches at the bottom of this article.
If you'd like to try your first ping; type in ping google.com. You will see the reply from the server in milliseconds. A summary will be displayed when finished. A successful ping would have a fast response time and no packet loss.
That's all there is to using ping; however, there are many available syntaxes.
-t - Ping the target until you force it to stop by using Ctrl-C.
-a - Resolve the hostname of an IP address target.
-n count - Set the number of ICMP Echo Requests to send, from 1 to 4294967295. The ping command will send 4 by default if -n isn't used.
-l size - Set the size, in bytes, of the echo-request packet from 32 to 65,527. The ping command will send a 32-byte echo request if you don't use the -l option.
-f - Prevent ICMP Echo Requests from being fragmented by routers between you and the target.
-i TTL - Set the Time to Live (TTL) value, the maximum of which is 255.
-v TOS - Set a Type of Service (TOS) value. Beginning in Windows 7, this option no longer functions.
-r count - Specify the number of hops between your computer and the target computer or device that you'd like to be recorded and displayed. The maximum value for count is 9. Use the tracert command to view all the hops between two devices.
-s count - Report the time, in Internet Timestamp format, that each echo request is received and echo reply is sent. The maximum value for count is 4.
-w timeout - Specifying a timeout value when executing the ping command adjusts the amount of time, in milliseconds, that ping waits for each reply. If you don't use the -w option, the default timeout value of 4000 is used, which is 4 seconds.
-R - Tells the ping command to trace the round trip path.
-S srcaddr -Specify the source address.
-p - Ping a Hyper-V Network Virtualization provider address.
-4 - Force the ping command to use IPv4 only but is only necessary if the target is a hostname and not an IP address.
-6 - Forces the ping command to use IPv6 only but as with the -4 option, is only necessary when pinging a hostname.
target -The destination you wish to ping, either an IP address or a hostname.
/? - Help switch plus the ping command will show detailed help about the command's several options.
Note that -f, -v, -r, -s, -j, and -k options work when pinging IPv4 addresses and the -r and -s options only work with IPv6.
Similar:
How to See Your Network Adapter Speed in Windows 10
How to Improve Your Wireless Network Performance
How to Reset Network Settings in Windows 10
How-To Reset TCP/IP or Internet Protocol
How to Find Your Router Login and Password
How to Update Your Router Firmware
comments powered by Disqus
