


Some Security Settings Are Missing or Have Been Changed
By Timothy Tibbettson 06/23/2023 |
"Some security settings are missing or have been changed" is an error that can appear when running Windows 10 troubleshooters.
Here are three solutions for this particular error.
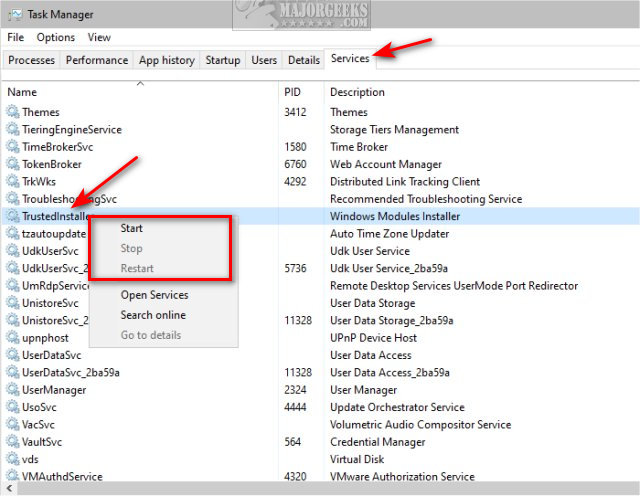
1: Restart TrustedInstaller (Windows Modules Installer Service)
Open Task Manager and click on the Services tab.
Right-click on TrustedInstaller (Windows Modules Installer Service), and click Start.
If that does not work, right-click and click Stop, then click Start again.
2: Re-register TrustedInstaller (Windows Modules Installer Service)
Open the Command Prompt as Administrator.
Type in the following two lines for a 32-Bit operating system. Press Enter after each:
%windir%\system32\msiexec.exe /unregister
%windir%\system32\msiexec.exe /regserver
Type in the following two lines for a 64-Bit operating system. Press Enter after each:
%windir%\syswow64\msiexec.exe /unregister
%windir%\syswow64\msiexec.exe /regserver
3: Repair Corrupted Files
Windows 10, Windows 8.1, or Windows 8 users will need to first run the Deployment Image Servicing and Management (DISM) tool before running the System File Checker. DISM will use Windows Update to provide any files that are needed to fix corruption. If you skip this step, System File Checker might not work. Windows 7 and Vista users can skip this step.
You will need to first open the Command Prompt or PowerShell as administrator.
Type in DISM.exe /Online /Cleanup-image /Restorehealth and press enter. This may take a few minutes.
All you need to do is type in sfc /scannow and press the Enter key.
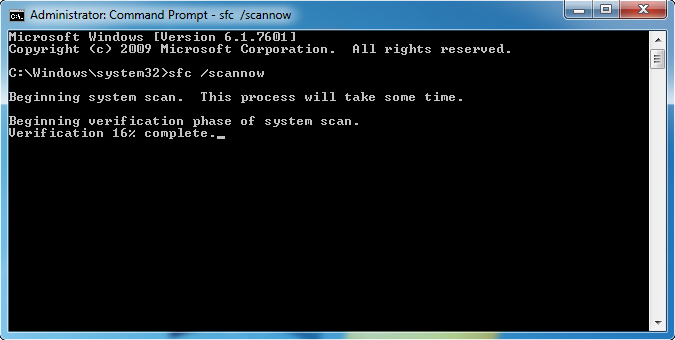
System File Checker will now scan for and replace files from the Windows cache.
Here are three solutions for this particular error.
1: Restart TrustedInstaller (Windows Modules Installer Service)
Open Task Manager and click on the Services tab.
Right-click on TrustedInstaller (Windows Modules Installer Service), and click Start.
If that does not work, right-click and click Stop, then click Start again.
2: Re-register TrustedInstaller (Windows Modules Installer Service)
Open the Command Prompt as Administrator.
Type in the following two lines for a 32-Bit operating system. Press Enter after each:
%windir%\system32\msiexec.exe /unregister
%windir%\system32\msiexec.exe /regserver
Type in the following two lines for a 64-Bit operating system. Press Enter after each:
%windir%\syswow64\msiexec.exe /unregister
%windir%\syswow64\msiexec.exe /regserver
3: Repair Corrupted Files
Windows 10, Windows 8.1, or Windows 8 users will need to first run the Deployment Image Servicing and Management (DISM) tool before running the System File Checker. DISM will use Windows Update to provide any files that are needed to fix corruption. If you skip this step, System File Checker might not work. Windows 7 and Vista users can skip this step.
You will need to first open the Command Prompt or PowerShell as administrator.
Type in DISM.exe /Online /Cleanup-image /Restorehealth and press enter. This may take a few minutes.
All you need to do is type in sfc /scannow and press the Enter key.
System File Checker will now scan for and replace files from the Windows cache.
